
Free Guide · 20 Min Read
Long Distance
Cycling Guide
Everything you need to ride 100+ miles. From building your base to dialing in nutrition, bike fit, and pacing. Written by someone who biked 112 miles during Ironman Wisconsin.
Why Long Distance Cycling?
Long distance cycling is one of the most rewarding things you can do as an endurance athlete. A century ride (100 miles) is the cycling equivalent of running a marathon. It tests your fitness, your nutrition strategy, your mental toughness, and your ability to suffer productively for 5-7 hours straight.
For triathletes, the bike leg is the longest portion of any race. In a half Ironman, it's 56 miles. In a full Ironman, it's 112. The bike is where races are won or lost, not because you need to be the fastest cyclist, but because a smart bike leg sets up everything that comes after it. Blow up on the bike and your run becomes a death march.
Even if you never race a triathlon, long distance riding is incredible on its own. There is nothing quite like covering 100 miles under your own power, watching the landscape change, and arriving somewhere that felt impossibly far away when you started pedaling that morning.
50
miles
Metric Century
100
miles
Full Century
112
miles
Ironman Bike
Building Bike Fitness From Scratch
If you're new to cycling or coming from a running background, the good news is that cycling fitness builds faster than you expect. The bike is low-impact, so you can handle higher training volume without the same injury risk as running. The bad news is that your butt, hands, and neck are going to hurt for the first few weeks. That's normal. It goes away.
Weeks 1-4: Foundation
Start with 3 rides per week: two short rides (45-60 minutes) and one longer ride (90 minutes to 2 hours). Keep the intensity easy . You should be able to hold a conversation the entire time. The goal is saddle time, not speed. Your body needs to adapt to the position, the pedaling motion, and the sustained effort.
Weeks 5-12: Building Volume
Increase your long ride by 15-20% each week. If you rode 2 hours last weekend, aim for 2:15 or 2:30 this weekend. Add one structured ride per week with intervals: tempo efforts of 10-20 minutes at a pace where talking is difficult but not impossible. This builds your aerobic engine faster than easy riding alone.
Months 3-6: Race-Specific Volume
By month three, your long ride should be approaching 3-4 hours. Start incorporating back-to-back ride days to build durability. Ride 3 hours on Saturday, then 90 minutes on Sunday. This teaches your body to perform on tired legs, critical for century rides and Ironman racing.
Pro Tip
Training for 100+ Mile Rides
Mile 80: The Verona Loop
A century ride is a completely different beast than a 50-mile ride. It's not twice as hard. It's exponentially harder. The last 20 miles of a century feel nothing like the first 20. Your glycogen is depleted, your muscles are fatigued, and your brain is begging you to stop. That's exactly why you train for it.
The Long Ride Progression
Build your long ride progressively over 8-12 weeks. A solid progression looks like this: 40 miles, 50, 55, 60, 50 (recovery week), 65, 75, 80, 65 (recovery), 90, 100. You don't need to ride 100 miles every weekend. Two or three rides over 80 miles in training is enough to know you can finish a century on race day.
Pacing a Century Ride
The biggest mistake in long distance cycling is going too hard too early. For a century, ride the first 50 miles at a pace that feels almost too easy. If you're using power, stay at 65-75% of your FTP for the first half. If you're going by feel, you should be able to chat comfortably. Save your energy for miles 70-100 when the real suffering begins.
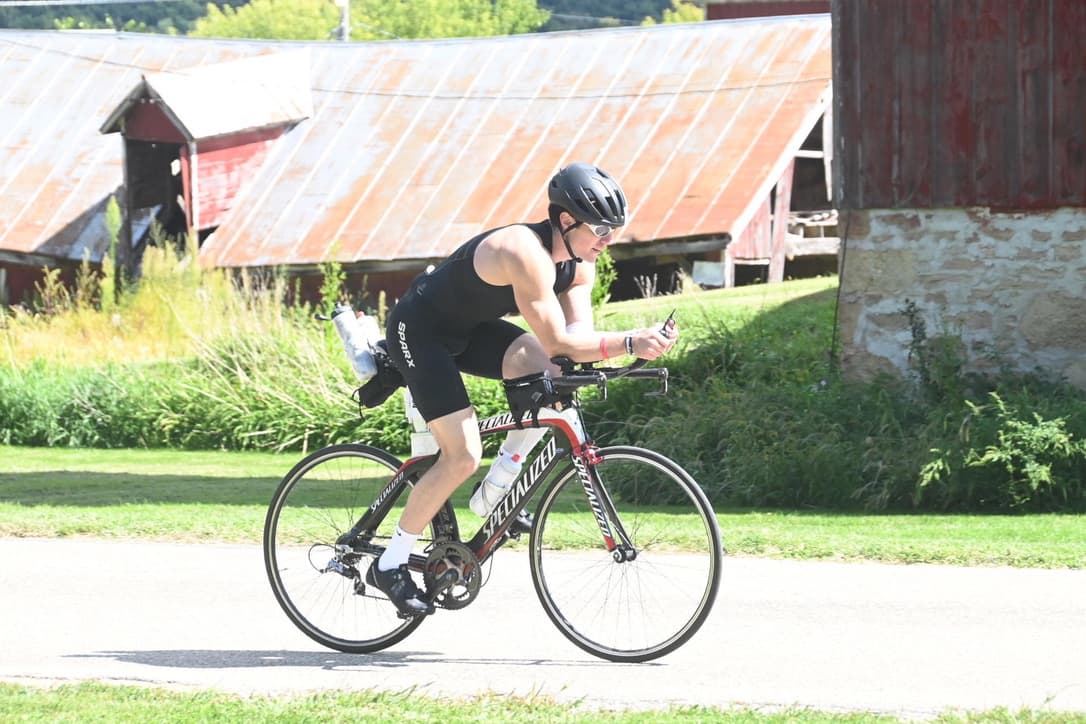
During Ironman Wisconsin, I rode the first 56 miles averaging about 17.5 mph. The second 56 I averaged closer to 16.2 mph. That's a normal split for a well-paced ride. If your second half is significantly slower than your first, you went out too hard.
Pro Tip
Bike Fit & Positioning
A professional bike fit is the single best investment you can make in long distance cycling. A bad fit over 20 miles is uncomfortable. A bad fit over 100 miles is destructive. It will wreck your knees, back, neck, and hands, and it will cost you significant power output.
Saddle Height & Position
Your saddle height determines knee extension at the bottom of your pedal stroke. Too high and you rock your hips side to side, causing lower back pain. Too low and you overload your knees. A proper fit gives you a slight bend (25-35 degrees) in your knee at the bottom of the stroke. Saddle fore/aft position affects how your knee tracks over the pedal. Ideally your kneecap sits directly above the pedal spindle when the crank is at 3 o'clock.
The Aero Position
For triathletes and anyone looking to ride faster, the aero position is huge. Aerodynamic drag is the biggest force working against you at speeds above 15 mph. Getting low and narrow on aero bars can save you 30-60 minutes over 112 miles compared to riding upright on the hoods. But aero position uses different muscles, primarily your hip flexors and lower back, and requires gradual adaptation.
Start with 10-15 minutes in aero during your rides and build up by 5 minutes per week. By race day, you should be comfortable spending 60-70% of your ride in aero. The remaining time on the base bars is for climbing, descending, and giving your back a break.
Hand & Neck Comfort
Numbness in your hands and pain in your neck are the two most common complaints on long rides. Change your hand position frequently: tops, hoods, drops, aero bars. Padded gloves help. For neck pain, strengthen your neck and upper back with exercises off the bike, and practice looking up periodically during rides rather than staring at the ground 3 feet in front of your wheel.
Pro Tip
Cadence & Power Zones
Cadence is how fast your legs are spinning, measured in RPM (revolutions per minute). Most recreational cyclists ride at 60-70 RPM in a hard gear. For long distance riding, you want to target 80-95 RPM. Higher cadence shifts the workload from your muscles to your cardiovascular system, which is more sustainable over hours of riding.
Why Higher Cadence Matters
Grinding a big gear at 65 RPM feels efficient early in a ride, but it torches your quads and hamstrings. By mile 70, those muscles are fried and you have nothing left. Spinning at 85-90 RPM in an easier gear produces the same speed with less muscular strain. Your legs will be fresher for the later miles, and if you're doing a triathlon, fresher for the run.
Power Zones for Long Distance
If you have a power meter, training and racing by power zones is the most effective way to pace yourself. Here's how the zones apply to long distance riding:
Recovery rides, warming up, cooling down.
The bread and butter of long distance riding. Most of your century should be here.
Sustained efforts on flats and gradual climbs. Sustainable for 1-2 hours, not 5-6.
Short climbs, race surges. Only use sparingly in a century or Ironman.
Short intervals in training only. Never in a long distance race.
Pro Tip
Climbing Strategy
Hills are where most long distance cyclists lose their race. Not because they can't climb them, but because they climb them too hard and pay for it 30 miles later. A smart climbing strategy is about energy management, not conquering every hill like a mountain goat.
Pace by Power, Not Speed
Your speed on a climb will drop. That's physics, not fitness. What matters is your power output (or heart rate) staying controlled. On a long climb, stay in Zone 2-3. Yes, people will pass you. Yes, it feels slow. But they are burning matches that don't grow back. You will catch them on the other side or on the flats that follow.
Gear Selection
Shift into an easier gear BEFORE the climb starts. If you wait until you're halfway up and your cadence has dropped to 50 RPM, you've already wasted energy. Anticipate the terrain and downshift early. Maintain your cadence at 70-85 RPM on climbs, which means using a much easier gear than you think.
Seated vs. Standing
Seated climbing is more efficient for sustained efforts. Standing uses about 10-12% more energy for the same power output because you're supporting your body weight. Save standing for short, punchy climbs or to briefly change your position and stretch your back on long climbs. A good rule: stand for no more than 30 seconds at a time on a long climb, then sit back down.
Pro Tip
Group Riding Etiquette
Group rides are one of the best ways to build cycling fitness and enjoy the sport. Drafting behind other riders reduces your effort by 25-30%, and the social element makes long rides fly by. But group riding has rules, and breaking them puts everyone at risk.
Essential Group Ride Rules
Hold your line. Ride in a straight, predictable line. Don't swerve, don't overlap wheels with the rider in front of you, and don't make sudden movements. If you need to move, do it gradually and call it out.
Call out hazards. Yell “hole” for potholes, “car back” for vehicles approaching from behind, “slowing” when you brake, and “on your left” when passing. Point out road debris. The riders behind you can't see what's ahead.
Take your pulls. When you're at the front of a paceline, you're doing the most work. Pull for 1-3 minutes, then move to the side and drift back. Don't be the person who sits in the draft the entire ride without contributing.
Don't half-wheel. Half-wheeling is when you ride with your front wheel slightly ahead of the person beside you, unconsciously pushing the pace up. It's the most annoying thing in group cycling. Match the pace of the group, not the other way around.
No aero bars in a group. Aero bars take your hands away from the brakes and make you less stable. In a group ride, keep your hands on the hoods or drops where you can brake immediately. Most group rides ban aero bars entirely.
Pro Tip
Indoor Training
Indoor training on a smart trainer or stationary bike is a game-changer for long distance cyclists, especially if you live somewhere with harsh winters. Platforms like Zwift, TrainerRoad, and Wahoo SYSTM offer structured workouts that target specific energy systems and make indoor sessions more tolerable.
When Indoor Training Makes Sense
Indoor training is superior to outdoor riding for structured interval workouts. There are no stoplights, no traffic, no coasting downhill. Every second of the workout counts. A 60-minute indoor session can deliver more training stimulus than a 90-minute outdoor ride because there's zero junk time. Use the trainer for weekday workouts when time is tight, and save weekends for outdoor long rides.
Zwift & Virtual Riding
Zwift turns indoor riding into a video game. You ride with other real people on virtual courses, join group rides, race, and follow structured training plans. It makes the trainer significantly more engaging than staring at a wall. The social element is real. You'll find riding partners and push yourself harder than you would alone.
Indoor Long Rides
Indoor rides longer than 2 hours are mentally brutal. Set up a TV show, a movie, or use Zwift's longer routes. Have a fan blowing directly on you. You sweat significantly more indoors because there's no natural wind cooling. Have water and nutrition within reach. Most importantly, don't try to replicate your outdoor long ride indoors minute-for-minute. A 3-hour indoor ride is roughly equivalent to a 4-hour outdoor ride in training load because of the constant pedaling.
Pro Tip
Nutrition on the Bike
Long distance cycling nutrition is a skill, not an afterthought. For rides over 2 hours, your body burns through its stored glycogen and you must replace calories while riding. Fail to eat enough and you bonk, a sudden, devastating loss of energy where your legs stop working and your brain fogs over. It's the cycling equivalent of hitting the wall in a marathon, and it's entirely preventable.
Calorie Targets
For rides of 3+ hours, aim for 200-350 calories per hour. Your body can absorb roughly 60-90 grams of carbohydrates per hour (more with training and dual-source carbs like glucose+fructose blends). Start eating at minute 30-45 of your ride, not when you first feel hungry. By the time you feel hungry, you're already behind.
What to Eat
The bike is the easiest time to eat during any endurance event. You're sitting down, your core is relatively stable, and your stomach handles food better at cycling intensity than running intensity. Use a mix of:
Gels
Quick, portable, 100 calories each. Take with water. Easy to carry in a jersey pocket or bento box.
Bars / Chews
200-250 calories. Good for the first 3-4 hours when your stomach is fresh. Harder to eat later in a ride.
Sports Drink
Combines calories, carbs, and electrolytes. Aim for 1-2 bottles per hour depending on heat.
Real Food
PB&J sandwiches, rice cakes, bananas, boiled potatoes. Great for ultra-long rides when your palate revolts against sweet gels.
Hydration Strategy
Drink before you're thirsty. A general target is 20-28 oz per hour depending on temperature and sweat rate. In hot conditions, you may need 36+ oz per hour. Include electrolytes in at least one of your bottles. Plain water alone will dilute your sodium levels over many hours (hyponatremia), which is dangerous.
Pro Tip
Gear Essentials
You don't need to spend $10,000 to ride a century. But you do need the right equipment to be safe, comfortable, and efficient over 5-7 hours in the saddle. Here's what matters and what doesn't:
Road Bike or Tri Bike
A road bike is perfect for centuries and triathlons. Tri bikes are optimized for aero but less comfortable and harder to handle. For your first century, a road bike with clip-on aero bars is ideal.
Helmet
Non-negotiable. Any CPSC-certified road helmet works. Spend $60-150 for a well-ventilated helmet that fits properly. Aero helmets are faster but hotter.
Cycling Shoes & Clipless Pedals
Clipless pedals connect your shoe to the pedal for better power transfer and efficiency. SPD-SL or Look-style for road. Adds 5-10% efficiency over flat pedals. Practice clipping in/out before riding in traffic.
Cycling Kit (Bib Shorts + Jersey)
Padded bib shorts are mandatory for rides over 2 hours. The chamois pad prevents saddle sores. A cycling jersey has pockets for food and a zipper for ventilation. No underwear under bib shorts.
Flat Repair Kit
Spare tube, tire levers, CO2 inflator or mini pump. Practice changing a flat at home before you get one at mile 60. A flat is a 5-minute inconvenience, not a ride-ender.
Bike Computer or GPS Watch
Tracks speed, distance, cadence, heart rate, and power. Garmin Edge or Wahoo ELEMNT are the most popular. Essential for pacing long rides and following routes.
Sunglasses
Protects your eyes from bugs, debris, wind, and UV. Cheap sport sunglasses work fine. Wrap-around style that stays put at speed.
Water Bottles & Cages
Minimum two bottle cages on your bike frame. For hot days or Ironman distance, add a behind-the-saddle hydration system for a third bottle.
Pro Tip
Safety & Maintenance
Long distance cycling puts you on the road for hours. Cars, road hazards, mechanical failures, and weather are all real risks. Respecting these risks is not paranoia. It's what keeps you riding for decades.
Road Safety
Be visible. Wear bright colors during the day. Use front and rear lights even in daylight. A blinking rear light is visible from much farther than a jersey. Avoid riding at dawn and dusk when driver visibility is worst.
Ride predictably. Signal turns, don't weave between parked cars, and obey traffic laws. Drivers expect predictable behavior. The moment you do something unexpected is the moment you're in danger.
Assume cars don't see you. Make eye contact with drivers at intersections. Don't assume a car will stop just because it should. Defensive cycling saves lives.
Basic Maintenance
You don't need to be a mechanic, but you should know how to:
Fix a flat tire
Remove the wheel, swap the tube, inflate with CO2 or pump. Practice this at home until you can do it in under 5 minutes.
Check tire pressure
Check before every ride. Road tires typically run 80-100 PSI (or as marked on the tire sidewall). Low pressure increases flat risk and rolling resistance.
Clean and lube the chain
Wipe the chain with a rag, apply lube to each link, wipe off excess. Do this every 100-200 miles or after riding in rain. A clean chain shifts better and lasts longer.
Check brakes
Squeeze both brake levers and make sure they engage firmly before the lever hits the bar. Worn brake pads are cheap to replace and critical for descending safely.
Pro Tip
Brick Workouts
Bike to Run: The Hardest Transition
A brick workout means doing two disciplines back to back, typically a bike ride immediately followed by a run. The name comes from how your legs feel when you start running after hours in the saddle: like bricks. For triathletes, brick workouts are the single most important training session of the week.
Why Bricks Matter
The bike-to-run transition is the hardest part of any triathlon. Your legs have been in a fixed, repetitive motion for hours. Your hip flexors are shortened from the aero position. Your quads are fatigued from pedaling. And now you have to run. The first mile off the bike is genuinely terrible. Your legs feel like they belong to someone else and your stride is completely off.
Brick training doesn't make this sensation disappear, but it teaches your body to find a running rhythm faster. After consistent brick training, the “dead legs” phase shrinks from 2-3 miles to 0.5-1 mile. That adaptation is enormous over a marathon.
How to Structure Brick Workouts
60-90 min easy bike followed by 15-20 min easy run. Just get your legs moving. Don't worry about pace.
2-3 hour bike followed by 30-45 min run. Practice your race nutrition on the bike. Run at target race effort.
4-5 hour bike followed by 45-75 min run. As close to race conditions as possible. Full nutrition plan. Race pace effort.
30-45 min hard bike (trainer works great) followed by 15-20 min run. Quick transition. Great for maintaining the adaptation during lower-volume weeks.
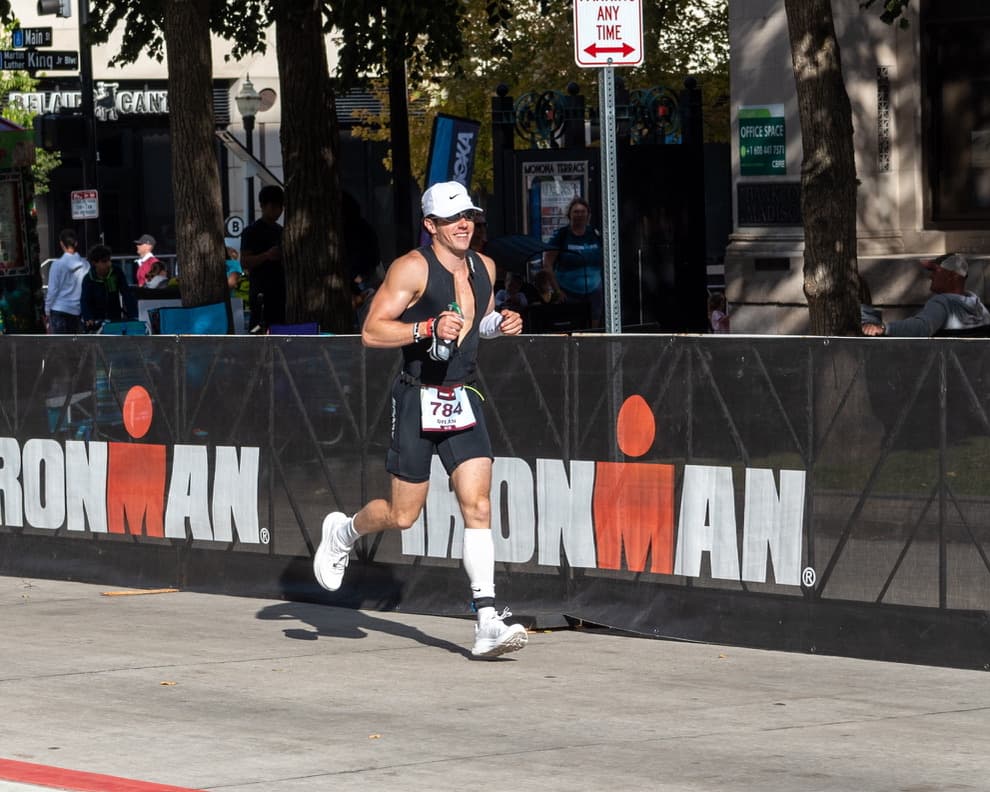
During Ironman Wisconsin, the transition from the bike to the run was the lowest point of my race mentally. My legs were dead from 112 miles and 4,000 feet of climbing. The first mile of the marathon was a 12-minute shuffle. But because I had done dozens of bricks in training, I knew the dead-leg feeling would pass. By mile 3, I found my rhythm. By mile 6, I was running my target pace. Trust the training.
Pro Tip
That's The Guide
Now Go Ride.
If this guide helped you, share it with someone who needs it. Follow along as I train for Ironman California 2026.
Track Your Nutrition
Download InstaCal
The AI-powered calorie tracker I built. Snap a photo of your food and get instant macro breakdowns. Perfect for dialing in your ride nutrition.
Get InstaCal